Posts

Happy Labor Day and Fall Project Series # 3

Image
If you are here in the US - today is Labor Day...unofficially a day for the last BBQ of the summer, a signal that fall is coming (not soon enough for me) and the last day we can officially wear WHITE (yes, I know that dates me...but growing up my Grandmother always told us we could only wear white after EASTER and before LABOR DAY...and I always listen to my grandmother). It was also a good day to catch up on a few projects, get the house straightened up and do a bit more decorating for fall. And I was excited to get to put together the little tablescape that I envisioned when I saw this cute filigree pumpkin at Hobby Lobby.  It needed a few more elements...and I wanted to bring in some of the colors of fall....so I picked up a variety of wooden acorns to go with it - knowing that I could find a way to add color to them (I forgot to take a "before" picture...but they were all brown like their tops - I didn't do anything to those). I did do a little video to show y...

Fall Project Series: #2 Card Sketch and Stamping With Bleach

Image
These cards were just FUN to make!  When I was a little girl, my Mom taught Sunday School at our church.  Her class became known among us kids as the "messy fun" department! Even though we were dressed in our Sunday Best, Mom always had plenty of Dad's old dress shirts that we could each put one on backwards (buttoned at the neck) as an Artist SMOCK and then we were free to use paint or glue or whatever was needed for our project. Every fall one of her projects called for us to take a walk outside to gather  up some of the beautifully colored fall leaves. We would use wax paper to capture them for a "placemat" to use at home.  I think that is when my love of fall first began! I just LOVE the colors and the smells and sounds of fall. The "sounds of fall" you might be asking.  Yes - there are some distinctive sounds that signal fall for me. Crunching leaves, a whistle in the wind and one that you might not expect...the sound of a high school marching b...

Fall Project Series: Cards

Image
Hello friends! I know that fall doesn't officially start until sometime AFTER Labor Day here in the United States, but in the "Land of Jann," I am SO ready for it to be fall that I am getting a bit of a jump on the season by starting a new series on the blog! (Hey don't judge me...I was in JoAnn's over the weekend and they had CHRISTMAS stuff up!) I love decorating my house for fall...and have a few projects in mind for that - just a couple of quick things that will freshen up my other decorations...so I will post a tutorial or two as I get those projects done. For the most part though, the projects that I have planned center around cards, gratitude journals (for myself and perhaps a friend or two...you never know - you might be that friend!) and a few other little things that I want to have ready for some family time at Thanksgiving.  I usually try and send Christmas cards to friends and family - but am going to try and actually send Fall/Thanksgiving/Thank...

OH MY STARS: The Parable of a Clean and Simple Card

Image
Actually... o. my. stinkin' . stars! So...many hours ago I had an idea.  It was a simple idea. A good idea. An idea that it would be fun to do a "start to finish" video tutorial on making a simple birthday card. Did I mention that I had this idea HOURS ago? It is Royce's birthday tomorrow...and I had been thinking about the card I wanted to make for him for several days. It was all worked out in my head. So I got out all of these lovely supplies....and started the video camera. My had two parts to my beginning idea. The first was to use some star shaped wafer dies to IMPRESS the star image into the cover of my card. And for the second, Royce is always teasing me about saying "Oh my stars!"...and when I came across a stamp ( Papertrey Ink: Glory Be ) that had the Oh My Stars stamp in it, I KNEW I wanted to use that as the front sentiment for his Birthday Card. I don't know if you have ever tried to do this, but it is a pretty cool way to get ...

Its Hard To Make A Sympathy Card When You Need One

Image
I found myself needing a card to send to a sweet friend this past weekend - and after digging through my stash of cards, I couldn't find ONE that was appropriate...and I was short on time to make one...but of course, I did.  I also made a mental note to sit down this week and get several cards made so I wouldn't be in that position again. Here are the basic cards I came up with....and I actually made about 10 of them in under 30 minutes. On some of them, I left the sentiment off so that I could add whatever I needed it to say, when I get to the point of sending them.  I used two stamp sets from Papertrey Ink: Simple Sunflowers and Stitches and Swirls to create the single layer backgrounds.  I thought you might want to see the process so I did a video showing how I made each of the basic cards. Thanks for stopping by. I hope you are having a good week and if you find yourself without some cards (ready to go), that you will find a bit of inspiration with th...

Go Team USA

Image
Are you having fun watching the Olympics? I wish I were able to just sit and watch every moment...there is something about seeing athletes show up at their peak, give it their all and triumph. And my favorite part?  When they are standing on the podium...and they hear their national anthem play. You know they have dreamed of that moment...and I always wonder how much they are able to soak it in, or if it is all a blur.  I know I would just be bawling my eyes out...I can barely make it through our national anthem just sitting on the couch! I have so many projects going on right now with some pretty serious deadlines, so I have had to settle for having the Olympics on in the background...but I do run into the room when I hear tons of cheering. So I thought I would share my fun nails in honor of the Olympics and Team USA... Sorry the lighting is bad...but you can get the idea. I have had fun learning stamp on my nails. You can read THIS POST to learn how it is done. ...

Take a little "happy" with you...

Image
I had a great phone call from a friend recently...she was calling to tell me she was pleasantly surprised when she went to her mailbox and found something other than a bill or store circular waiting for her...a little card from me.  My "take away" from that was to realize that in this ELECTRONIC-centric world that we live in....cards and handwritten notes take on new significance.  People rarely get cards "just because" - and when they do it has a high impact. I was headed out to a family get together today...and in addition to the pan of baked beans (remind me to share my recipe with you sometime...it is super simple and always a big hit) I made a quick card. I tend to be a bit "punny" so the sentiment inside says "Thanks for inviting me to hang out with your flock!" Flamingos are a favorite of the hostess so that was really the inspiration for my card...I cut them out on my Silhouette.  Here are a couple of details... I used a re...

Using what is left...

Image
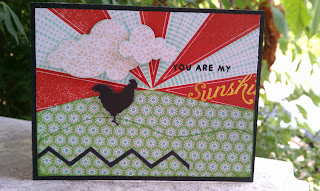
If you have been a following of my blog - you know that I am a big proponent of using up my "stash." Oh yes, I love new crafting supplies as much as the next person...but I sometimes have greater inspiration when I try to use what is left in a creative way.  My last blog post showed you two layouts where the "confetti" was actually the stars and hole punch outs from other projects...and I think several of the ribbons and strips of die cuts were also things that were just snippets left from other projects that I hadn't "put away" just yet. So today, I though I would do a quick share because three elements of this card came from "using what is left...from other projects. First...the green grassy hills is a bit of creative cutting and placing from a strip of left over pattern paper. When I make cards I like to use 6x6 paper pads because the scale of the print is appropriate, and you have "pre matched" colors and patterns to wor...

In the meantime...

Image
Well hello there friends. I was really hoping to get a video edited for you all today...but I didn't.  So...in the meantime I will share a couple of layouts. One that uses the same technique that I shared in my last video...and one that I am going to show you in the video I need to edit! (I shouldn't even tease should I?) Do you see the flowers?  I used the same technique of masking and quick coloring on these flowers...just a LOT brighter...more Kati-esque than my rather sedate cards!  I stamp a couple extras and cut them out and popped them up to create the floral frame.   A couple of other details...I used my score board to  score two parallel lines on each side of the white paper that I stamped the flowers on.  Here is a tip - mat your picture first and draw some light pencil lines before you stamp....then you only have to color the parts of the flowers that are going to show. Once I had done the stamping and I put the picture back in p...

Stepping Up Line Art Stamps: Tutorial

Image
Well I hope you have had some time for creativity this week...I did - and the thing I am MOST excited about is that I have been able to get back to creating videos for some of my projects!  I have missed getting to share the "process" with you and am super glad to be back on track. I have a fun project to share with you today...using a Papertrey Ink stamp set - A Year In Flowers: Marigolds . It is perfect for this type of card because it is "line art" which works great for doing a little or a lot of coloring....with markers, colored pencils or watercolor. You can see I opted for doing just a bare minimum of coloring. I needed to make several gifts for some friends and wanted them to be handmade...but I had a real short window of time to create them in...so I just had to come up with an idea that had a lot of visual punch but could be created fairly quickly.  These line art stamps were just the ticket. One of the things that I love about working with Papertrey...

New Things to Stamp

Image
Ok...so you all know that I have a tendency to stamp just about everything.  I have been known to alter chipboard embellishments with some custom stamping...stamp a background for a card or layout, stamp a title or even all of my journaling.  I have stamped buttons, metal flowers, acetate and photos. So - it was probably a natural progression for me to take my love of stamping to my fingernails. There is a bit of a backstory.  For the past 25 years, I have worn acrylic nails.  As a teacher and speaker, I KNOW I talk with my hands...it is unconscious....I just do it - and I have just worn acrylic nails - usually in a really understated french manicure.  As a crafter, I can be REALLY hard on my hands....I am always splashing paint or ink and my hands just end up being a mess.  A few months ago I decided it was time to leave the acrylics off my nails and let them just BREATH!  I loved my well manicured nails, but I felt like they needed a break...but...

Herd It Was Your Birthday

Image
Summer is full of birthdays in our family...and that is just the excuse I need to get out my stamps and come up some fun new cards...and my family knows that I really can't resist a good pun! Thought I would share this fun little card with you...it is square 4.25 x 4.25.  I used a couple of Papertrey Ink stamp sets and Dies: On The Farm and Hello Sunshine. The sky and grass part of the scene are from On The Farm - and I stamped the sky on a piece of My Mind's Eye paper from a 6x6 pad...love these for card making because they are smaller scale prints that work well for this format. I did a little machine stitching around each of the pieces to give them a bit of definition. The cows in the "herd" were die cut with the On The Farm dies from another piece of My Mind's Eye paper...I love how they look kind of "mod-ish!" To make them stand out against the background, I took a Copic marker and just ran it around the edge...instant POP!...

Sometimes the Perfect Embellishment...is a CHALLENGE

Image
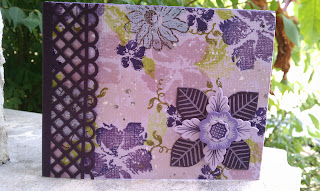
Have you ever been working on a project and just not known what you needed to do to finish it? I had such a clear idea when I started on these cards. I wanted to create a monochromatic card with a stamped background. Specifically, I had found this set of stamps by Technique Tuesday when I was cleaning my studio...and stamping sounded MUCH more fun than cleaning! As you can see, the stamp set has flowers, leaves and swirls of different sizes - perfect for creating the background. And that was the end to my inspiration.  I should have taken a picture of the stamped panels...I certainly had plenty of time to do that - since I finished stamping them three weeks ago and they have been sitting on my desk just staring at me. Nothing. I had nothing.  Not one single idea. I had two 4.25 x 5.5 panels with pretty purple flowers all over them....and nothing I tried worked.   But then, last Monday I popped over to the Papertrey Ink blog to check out the Make It Monday ...