Posts

Christmas 2012 Series: #4 December Daily Binding
Image
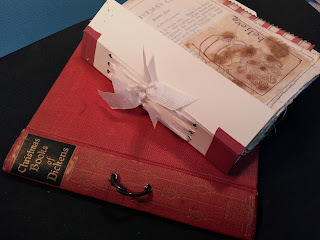
We're making progress! I've gotten the binding done and all my base pages mounted into "signatures." I didn't want to put the binding through the actual spine because I wanted to preserve the title - so I created a hidden "faux" spine to bind the signatures and then I can attach it to the front and back cover. I used seam binding to attach the signatures through the spine. Seam binding is strong - but keeps the vintage feeling of the overall altered book. I created a tutorial to show you the steps in the binding process...you can watch it here or on YouTube: I am working on decorating the cover - and will have that tutorial ready for you soon! Am pretty excited about how it is turning out.  Thanks for stopping by - and I hope you have a wonderfully creative weekend!

Christmas Project Series: Projects #2 & #3

Image
Hope your week is off to a great start and that you had some creative time over the weekend. I was able to work on a card for Sybil (JandSib80 on YouTube).  I really love this knit stamp set from PaperTrey Ink. I know I will want to make several more of these little Sweater Cards.  I'm trying to figure out how to make one of those tacky Christmas Sweaters (I still have a couple in my closet that my Mom gave me - I think she secretly wanted me to be a kindergarten teacher! LOL) Here is the tutorial I did for the Sweater Card. You can watch it here or on YouTube. I also got the base pages made for my December Daily! Do you see muslin patches I sewed onto the base pages? I had some Coffee Dyed fabric left over from when I made my Thanksgiving Blessing Box during the Fall Project Series  so check out that tutorial if you want to know how to make your own.  I tore it into strips and stamped some images and scriptures onto them.  I am going to ...

December Journal Inspiration

Well - I hope if you live here in the United States, that you have enjoyed too much food and plenty of good fellowship with friends and family today.  We had a lovely time - and the guys are in a turkey and football coma (absolute happiness for them, except I seem to have heard quite a bit of yelling at the tv screen - so I am assuming that their teams aren't doing too well!) The perfect time for me to come get a blog post written and to share a little December Journal Inspiration with you. Here is a flip through my journal from last year...and a little peek at my plans for this year's journal.  I have been planning this for a while.  Do you ever do that? Have an idea in your mind - and hope that what you create lives up to your imagination? I am excited about my idea...as I have been collecting bits and pieces for this one for several years...and I am going to be creating several tutorials that hopefully will keep your creative juices flowing if you are working on a Ch...

Happy World Card Making Day....Sort of

Image
Well stink... The internet is off at my house...and me with three more videos to upload. Drats and double drags!  I am making a quick post here via my phone to let you know that I will upload the videos as soon as the internet is back.  I have been having fun creating cards like crazy  - I need to have a day to get the studio back in order!  Nah....I'm going to keep going while the mojo is stirring! Here are a few pictures to give you a taste of the projects I will share as soon as I can! Hope you have had a great day!

Happy World Card Making Day - Card 1

Image
My studio is a MESS....but I am having a ton of fun. I've pulled together some projects that I hope you will enjoy and find some inspiration for your own card making. Let's get right to the first one. I fell in LOVE with these mustaches...and bought them - with not ONE thought of what I was going to do with them....sometimes you just have to do that....get the thing that speaks to you and figure out what to do later...especially when the "thing" was just $1.99. I now have a fun little 4.25 x 4.25 masculine card that I can use for a surprise note to my honey! Well...and since I made a second one to show you the process....I will have to come up with someone to send it to! Here is the first video... be sure and watch to find out how you can be eligible for my WCMD Giveaway.  Just a little added fun! Thought you might want to see that little alpha die up close...it is by Die-Versions and I got it here . They may be out of s...

Fall Projects #5 & #6

Image
 I have been a baaaa-ad blogger!  I actually have TWO projects to share with you...so hang on to your hats! The first is a fun "folk art" style card. And the technique I wanted to share with you involves using your "colorless blender" Copic market to add texture to images that you color. The stamped image is from Papertrey Ink's "Autumn Hills" set.  I love all the little bits and pieces that you get in the stamp set...I used two of the companion stamps to "spiff up" the inside. Don't you just love that "peek-a-boo" die cut strip down the right side of the card?  That is a fun Memory Box die called Piestra Tile.  The detail it adds really means that you don't have to do much embellishing  to your card...it does all the work for you! I did add just a touch of Chestnut Liquid Pearls in the centers of some of the lacey cuts. You will want to watch the video either here or on YouTube because it explains how to use your co...

Fall Project Series #4 - Inspired by Louise Nelson

Image
I am SO EXCITED to share this project with you! I had so much fun playing and experimenting...and I am pretty sure I am not quite done with the "creative play" that started with this layout. As I told you in my last post, I have been enjoying the art of Louise Nelson...a designer who lives in Australia. She does some SERIOUS - outside the box creating.  You can check out her blog here.  Her projects have such a wonderful sense of movement and feel very organic.  I have been wanting to try and apply some of the things that she uses on her layouts, and this fall layout seemed the perfect time. See what I mean? She creates backgrounds that I would describe more as "back drops" for her overall design...I love it! I couldn't wait to try to create my own take on the inspiration that I find when I look at her projects. Source Louise uses "gray board" (raw chipboard) for her base and often uses gesso in a sprayable form to create her subt...

Happy Labor Day and Fall Project Series # 3

Image
If you are here in the US - today is Labor Day...unofficially a day for the last BBQ of the summer, a signal that fall is coming (not soon enough for me) and the last day we can officially wear WHITE (yes, I know that dates me...but growing up my Grandmother always told us we could only wear white after EASTER and before LABOR DAY...and I always listen to my grandmother). It was also a good day to catch up on a few projects, get the house straightened up and do a bit more decorating for fall. And I was excited to get to put together the little tablescape that I envisioned when I saw this cute filigree pumpkin at Hobby Lobby.  It needed a few more elements...and I wanted to bring in some of the colors of fall....so I picked up a variety of wooden acorns to go with it - knowing that I could find a way to add color to them (I forgot to take a "before" picture...but they were all brown like their tops - I didn't do anything to those). I did do a little video to show y...

Fall Project Series: #2 Card Sketch and Stamping With Bleach

Image
These cards were just FUN to make!  When I was a little girl, my Mom taught Sunday School at our church.  Her class became known among us kids as the "messy fun" department! Even though we were dressed in our Sunday Best, Mom always had plenty of Dad's old dress shirts that we could each put one on backwards (buttoned at the neck) as an Artist SMOCK and then we were free to use paint or glue or whatever was needed for our project. Every fall one of her projects called for us to take a walk outside to gather  up some of the beautifully colored fall leaves. We would use wax paper to capture them for a "placemat" to use at home.  I think that is when my love of fall first began! I just LOVE the colors and the smells and sounds of fall. The "sounds of fall" you might be asking.  Yes - there are some distinctive sounds that signal fall for me. Crunching leaves, a whistle in the wind and one that you might not expect...the sound of a high school marching b...

Fall Project Series: Cards

Image
Hello friends! I know that fall doesn't officially start until sometime AFTER Labor Day here in the United States, but in the "Land of Jann," I am SO ready for it to be fall that I am getting a bit of a jump on the season by starting a new series on the blog! (Hey don't judge me...I was in JoAnn's over the weekend and they had CHRISTMAS stuff up!) I love decorating my house for fall...and have a few projects in mind for that - just a couple of quick things that will freshen up my other decorations...so I will post a tutorial or two as I get those projects done. For the most part though, the projects that I have planned center around cards, gratitude journals (for myself and perhaps a friend or two...you never know - you might be that friend!) and a few other little things that I want to have ready for some family time at Thanksgiving.  I usually try and send Christmas cards to friends and family - but am going to try and actually send Fall/Thanksgiving/Thank...

OH MY STARS: The Parable of a Clean and Simple Card

Image
Actually... o. my. stinkin' . stars! So...many hours ago I had an idea.  It was a simple idea. A good idea. An idea that it would be fun to do a "start to finish" video tutorial on making a simple birthday card. Did I mention that I had this idea HOURS ago? It is Royce's birthday tomorrow...and I had been thinking about the card I wanted to make for him for several days. It was all worked out in my head. So I got out all of these lovely supplies....and started the video camera. My had two parts to my beginning idea. The first was to use some star shaped wafer dies to IMPRESS the star image into the cover of my card. And for the second, Royce is always teasing me about saying "Oh my stars!"...and when I came across a stamp ( Papertrey Ink: Glory Be ) that had the Oh My Stars stamp in it, I KNEW I wanted to use that as the front sentiment for his Birthday Card. I don't know if you have ever tried to do this, but it is a pretty cool way to get ...