Posts

Wax Resist Technique

Here you go on the tutorial vid...hope you enjoy it. Wanted to let you know that our family received some difficult news yesterday. My Dad (84 yrs old) has been diagnosed with AML (leukemia) and will begin chemo therapy on Monday. We have had great conversations as a family about this - and as my dad has been an athlete and very healthy all his life - we are all in agreement that he should take this course of treatment. He has a good prognosis - and while it will no doubt be VERY rough on him - we believe the outcome will be for him to eventually return to all the things that he loves doing - playing golf (he had played 14 holes of golf just prior to getting this news), hunting with his brother, and hanging out with family - particularly his grandkids. We would appreciate your prayers. We know that God carries us through even our DARKEST hours - and makes the way clear. Royce and I can attest to His faithfulness in these kinds of moments from very personal and recent experience. ...
It's a "Texture" kind of day!

Image
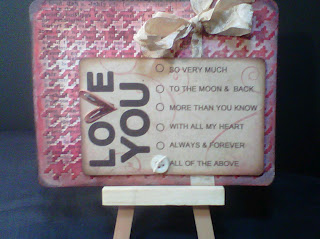
I went into my studio with the intention of making some Valentines...and well - I ended up playing around with some texture fades, paint and crayons! I had the best time...and wanted to share the results with you. I am going to do a video tutorial in the next day or so - but thought I could whet you appetite with a couple of pictures. I love how these turned out...and I just kept on playing (more "scraps" to go into the pile to be used for the Stash Diet Challenge ) The Valentine Card at the top of this post was created by adding some dictionary paper to a piece of thin chipboard (like a cereal box kind of thickness) with gel medium. Then I ran it through my die machine with the Houndstooth texture folder. The next step for all of these was to use a really CHEAP crayon to rub and add color to the raised portion of the embossed surface. The wax from the crayon will resist just about ANY paint or waterbased ink that you rub over it - so from there it was just "Katy Bar The...

Stash Diet Challenge Intro

Hey Friends...Happy Sunday to you! I made a fun little video to introduce you to the Stash Diet Challenge. .. You can come be a part of our first round starting today and running through January 30th. The first challenge is to use up PAPER scraps....I have a whole drawer full...and I think some of the paper is just GORGEOUS...but I need to USE it! I am planning to do a quick video to show you some of the ideas that I have come up with to use up my stash of paper pieces. Do you have some extra scraps that you want to try and use up -- AND get some projects done? Come join us on Your Paper Pantry . It will be fun. Hope you will join us! Jann

Stash Diet Challenge

Hey Everyone! Ok...so the New Year probably saw each of us making resolutions (re: family, personal, spiritual, financial....um perhaps even losing weight or getting back in shape)! I set some crafty goals too! (See how I skipped right over the losing weight/getting in shape option!?!?!? LOL) I have already done a studio clean up and purge...and am now ready to work on a couple of my other goals for this year.... 1. Reduce the stash (let's not call it hoarding) 2. Complete more projects (including page layouts). 3. Think outside the box when using tools and materials I already have. I always do a LOT better with my goals (still not talking about weight loss or working out) when it is FUN and I have friends to do it with...so I talked to Roxy on Your Paper Pantry about doing what I am going to call the STASH DIET CHALLENGE (a little play on a "crash diet" - but am STILL not acknowledging the lose weight option of New Year's Resolutions *smile*) The goal is going...

Shooting the Cricut DVD Series

Image
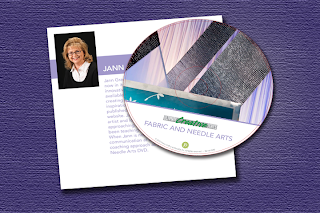
I had the best time working with the folks at Provo Craft on the new Creative Inspiration DVD Series. I felt totally honored when Cathy Miller asked me if I would be willing to be one of the Creative Coaches for the series...and OF COURSE said YES! *smile* Cathy asked me not to share it with you until the product was ready for release. So, I kept the secret until she said it was ok...and now the DVD Series is up and "coming to a tv" near you! Kent Findley (the producer/director) of the DVD series took my camera and got some behind the scenes footage for me and I have put it together into a short video. Would you like to see it? The projects that I demonstrated were for the Fabric Arts DVD. Did you know how easy it is to use your Cricut to create projects with fabric? I love all the projects I had the opportunity walk the viewers through...and am pretty sure you would too. My DVD has 10 projects on it...and we managed to get the ALL shot in ONE day! Ok - so it was a VE...

Simplicity Journal Giveaway

Two posts in one day....can you believe it! I wanted all of my blog readers to also have a chance to win this journal...so if you haven't yet subscribed to my YouTube channel please do so here ....and leave a comment on the video before Sunday for a chance to win! Good luck!

Make Your Own Vintage Looking Wallpaper Samples

I had the best time playing around with this technique using my Cuttlebug, white cardstock, Glimmer Mists and a little bit of Rub n' Buff (by Amaco)...you can do it too... Let me know what you think!

Paper Doll Mini Album - Tin Purse

Image
Happy New Year! I hope this new year finds you well and filled with anticipation for 2010. I am really looking forward to what this year will hold. I have started creating some inspiration and instruction videos -- and am hoping to keep them coming throughout the year. To start off, I wanted to share a fun project that I just finished for my niece, Kati. You can see the YouTube video here. I made a mini-album and a set of Princess Paper Dolls. I also decorated a tin purse for her to keep them in -- all using the Cricut Cartridge - Paper Doll Dress Ups. It is a really cute cartridge that I have seen lots of people use to embellish their scrapbook pages. That really isn't my scrapping style -- but it has a lot of cute elements that will be fun to use even if I don't use the dolls on my pages. However, as I was looking through the booklet -- I was totally taken back to when I was a little girl and loved to play dress up with my paper dolls. Making this set of dolls for h...

Mini Album Made from Medical File Folder

FINALLY! I am finally getting around to creating some YouTube videos to share creative ideas and tutorials on some of the projects I have done for our What You Make It television show. Here is my first video...so be kind -- but seriously, give me feedback and let me know what you think...or what kind of projects you would like to see. You can watch the Searching for Winter - Mini-Album video on YouTube. This project entitled "Searching for Winter" was a mini-album that I created as a Father's Day Gift for Royce about the time he arranged forWestonto be in a local independent film (when he was in the 6th grade. The film was shot over several months and there were LOTS of stories and adventure associated with the project. Not everything we want to remember will fit neatly into a scrapbook album -- and I LOVE mini-albums for those kinds of projects. Using this medical file folder gave me LOTS of places to add tons of pictures and journaling...and at the back -- a place ...

In Character

Image
I love the new cardstock that Jenni Bowlin has created with Coredinations. It is embossed and is made of two contrasting colors -- this one is red behind black. When you sand it -- the red is revealed in the pattern of some of her papers. It is delightful! I used my cricut to cut out the large label shape -- and then used some temporary tape to tack it onto the page. Then I took some sandpaper and wrapped it around a stamping block so that I would have a fairly large flat surface with which to sand. The die cut kept me from sanding the cardstock where it was sitting so it left a great place to put my photo. I thought the background had a bit of a stamped leather look -- so decided to use it for the picture of Royce when he was headed out to PowWow (Royal Rangers -- camp) -- the men always go as guys from the 1800's -- and the character he has developed over the years is Trader Gray . The boys love to come up with something to "trade" with him for -- so he has amass...

You Have My Heart

Image
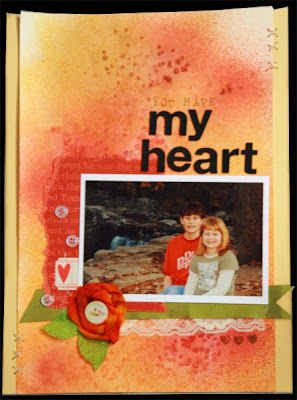
I have had this picture of my niece and nephew for awhile -- but haven't been totally sure how I wanted to scrap it....so it has been sitting on my table for me to look at until I knew. When I finished this background (as part of my techniques class) -- I just knew that this picture would finally find its home! The background was created with Adirondack Color Wash and Sea Salt....I KNOW -- I never would have dreamed that one up -- but Julie (our teacher is FANTABULOUSLY creative! You can still take this class from her -- and I would highly recommend it. You can learn more about her art -- and her class HERE. I wanted you to see a bit closer detail of the "rose" I created for this page. Are you ready for another shocker?!?! That is made from a baby wipe! I bet you are thinking "Is there NOTHING she won't keep and try to use?!?!?" *laughing* The answer is "probably not!" The baby wipe got saturated with color wash during my "technique s...

Practically Perfect

Image
I am taking the MOST fun class with Julie Fei-Fan Balzer! She is Amazing! You know the kind of artist that just makes you sit and stare at their work...well she is one of those. You need to check out her blog . Anyway -- as I said, I am taking an on-line techniques class with her -- and I am finding I am ending up with lots of yummy bits and pieces. So what do you do with bits and pieces? Well -- they kind inspire me to quilt. Even when they are paper pieces. So this is a layout I created with several of the scraps of paper I have created during my class homework assignments. I love this picture of my sister...it captures the JOYFUL side of her -- and that is just ONE of the many reasons that I think she is PRACTICALLY PERFECT in every way....kind of like Mary Poppins! Have a lovely rest of your week!

Just a Minor Baby Step Blog

Image
This year started out so strong -- so many creative ideas....that needed exploring....and then -- well....then LIFE -- the big ole capital letters version of LIFE stepped in. So much of it it...all at once...and then it felt lie it did a big ole DOG PILE on top of me. Those of you that know me well -- know that being creative is an outlet for the stresses and the strains of life....and the fact that there hasn't been much creativity to show for the past few months should tell you that I have not been in a place to be doing much creativity. But I do truly Believe that is going to begin to change! I have been back in my studio -- bit by bit...and it feels GREAT. I am taking a wonderful on line class from Julie Fen Fan Balzer. She is amazing Check her out here. ..and has gotten my inspirational brain in gear....so hopefully you will be seeing some more creative activity from me soon. One other thing of note...my very favorite camera producer...THE POLOROID...has a new printer/cam...

Chosen

Image
There are so many reasons that I love scrapbooking...the fact that I know I am creating a collection of pictures and stories that are important to our family...and the those family members that are not here yet -- and some I may not ever have the privilege of meeting. They will know more about us than I have been able to find out about my ancestors....I think of it as my gift to them. And while that is the BIG motivator for me most of the time...another thing that I love about scrapbooking is the fact that sometimes it gives me the opportunity to create a meaningful gift for someone else. This shadowbox is an example of that...I created it for a baby dedication we were doing this past weekend at our church. "Champ" is the little boy -- and what a cutie, huh?!?! He was adopted when he was just almost a year old....so we didn't really have "baby" pictures to work with....but I think the ones we chose to work with were just precious. I used three pictures and...

On-line Gift Certificates

Ok...so today is a bit non-craft/scrapbooking related -- but it could help you get some new crafty stuff....so read on! I know we are all looking for ways to save money in these economic times -- and I found one way I wanted to share with you. It is called SWAGBUCKS! Here is how it works...you use their search engine (powered by Google) for the internet searches you would be doing anyway...and each day you are awarded or win a certain number of SWAGBUCKS. (You must be signed into your Swagbucks account) but it is really simple -- and each day you have to potential of winning 1-5 Swagbucks...I haven't ever won more than 3 -- but I see others get 4 or 5 -- so know that it is possible. Honestly -- once you win for the day -- you can continue to use it or go back to your normal search engine because you only win once a day. Your account accumulates your Swagbucks...and then you can redeem them for gift certificates or other items. Pretty cool -- and TOTALLY FREE! To get started.......

Tear It Up

Image
I had so much fun in Houston last weekend visiting one of my best friends, Mona. She has a lovely home -- and three beautiful grown daughters that love to come over and spend time with their mama. I love spending time with them too -- and they brought their absolutely precious kiddos with them. It was beautiful weather (which if you know Houston -- is a rarity due to humidity) and we spent time sitting on the porch talking and laughing...and almost as much time around the kitchen island cooking and talking and laughing. It was just the best few days...so good for my soul. One afternoon I had the opportunity to take a few pictures of the newest member of their family...NASH. With beautiful natural light on the front porch, we just threw some blankets down and started snapping pics. He is so beautiful. I just had to scrap a few of them -- and will post a few more later this week (gotta get those dreaded taxes done before I can play!). The page above was created by using some scra...

Pictures aren't ALWAYS necessary

Image
I know that is almost scrapbooking heresay, right?!?!? Seriously, if you have a story to tell, but no picture to go with it -- you STILL need to tell the story. I decided to let a bit of my "artistic" self emerge to create the setting for this particular story. So I had fun with paint and stamps...making sure to leave room for the STORY. Do you have a story to tell? I can't wait to read it! Go for it.

Letting your cardstock take Center Stage

Image
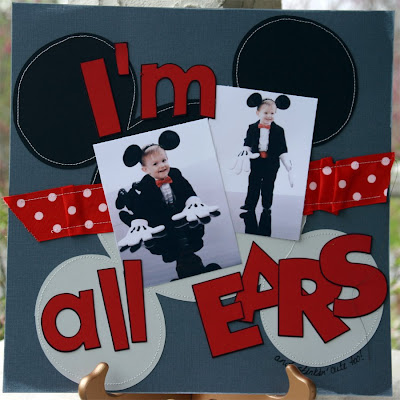
You know me...I love the layered page...I love techniques...I love distressing....but every once in a while -- I want to get back to the basics. These two pages were really about letting the cardstock be the basis of the page....and I like how they turned out. They are from two extremes of Weston's life -- but in both -- he clearly knows how to work the camera... In this first one, I tried to make the Mickey Ears reflect the "REFLECTION" of weston in the pictures.... I think that the red pops off the page a bit more because I outlined the letters....just an idea. If you are using a Cricut, you can use the Cricut Color Markers before you cut out your shapes and they will come out evenly outlined...a time saver and a nice touch. On this layout, I used one of the Cricut Shapes from the Graphically Speaking cartridge. It is an element that I think was intended as a "foundation" shape for a mini-book...but I resized it to FILL THE PAGE....and I love the rounded e...

Fun with Embossing

Image
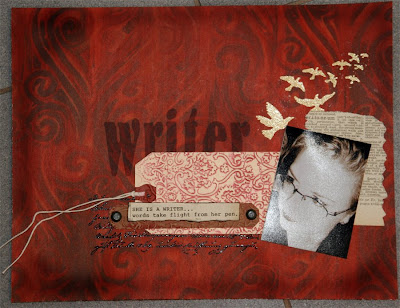
I have used two different kinds of embossing on this layout. The birds and the script underneath the tag are both stamps that I then used embossing powder on and then heat set. The tag is something new that I just discovered you can do with your Cuttlebug. If you will ink your Cuttlebug Embossing folder(any kind of ink other than permanent ink like Stazon) prior to running your paper or tag through the Cuttlebug you will get a very interesting embossed background. I tried inking both sides of the embossing folder and found I like the results best on the side that actually has the Cuttlebug logo printed on it. When you are done, just use a baby wipe to clean off any remaining ink. My mind is spinning with fun new ideas...and will be sure and post them here. Hope you have had a good Saturday...is it Spring where you are?

A Couple More Edgie Ideas

Image
I had a great time Friday Night with my scrappy girls! It was cold and messy outside -- but as usual it was warm, fun, friendly and full of encouragement inside! I had a couple more ideas about how to add an "edge" to your page and thought I would share them with you. In the layout above (ok...how funny is that picture of me and my sister putting on a "show?") I used a piercing tool to prepare my layout for some hand stitching (I wanted to add a bit more orange to the layout). Then before i did the sewing, I used some distress ink in a similar tone to the background cardstock to darken the edge...then went ahead and added the orange stitching. On the layout below -- I simply used a pencil and a scalloped edge ruler to mark the scallops onto my background. I then painted with white paint on the outside of the scallops and finished it off with a sharpie giving a good thick line to the edge.