Posts

Showing posts from March, 2009

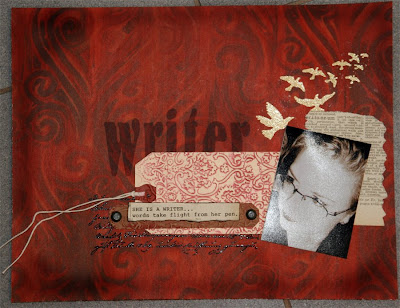
Pictures aren't ALWAYS necessary

Image
I know that is almost scrapbooking heresay, right?!?!? Seriously, if you have a story to tell, but no picture to go with it -- you STILL need to tell the story. I decided to let a bit of my "artistic" self emerge to create the setting for this particular story. So I had fun with paint and stamps...making sure to leave room for the STORY. Do you have a story to tell? I can't wait to read it! Go for it.

Letting your cardstock take Center Stage

Image
You know me...I love the layered page...I love techniques...I love distressing....but every once in a while -- I want to get back to the basics. These two pages were really about letting the cardstock be the basis of the page....and I like how they turned out. They are from two extremes of Weston's life -- but in both -- he clearly knows how to work the camera... In this first one, I tried to make the Mickey Ears reflect the "REFLECTION" of weston in the pictures.... I think that the red pops off the page a bit more because I outlined the letters....just an idea. If you are using a Cricut, you can use the Cricut Color Markers before you cut out your shapes and they will come out evenly outlined...a time saver and a nice touch. On this layout, I used one of the Cricut Shapes from the Graphically Speaking cartridge. It is an element that I think was intended as a "foundation" shape for a mini-book...but I resized it to FILL THE PAGE....and I love the rounded e

Fun with Embossing

Image
I have used two different kinds of embossing on this layout. The birds and the script underneath the tag are both stamps that I then used embossing powder on and then heat set. The tag is something new that I just discovered you can do with your Cuttlebug. If you will ink your Cuttlebug Embossing folder(any kind of ink other than permanent ink like Stazon) prior to running your paper or tag through the Cuttlebug you will get a very interesting embossed background. I tried inking both sides of the embossing folder and found I like the results best on the side that actually has the Cuttlebug logo printed on it. When you are done, just use a baby wipe to clean off any remaining ink. My mind is spinning with fun new ideas...and will be sure and post them here. Hope you have had a good Saturday...is it Spring where you are?

A Couple More Edgie Ideas

Image
I had a great time Friday Night with my scrappy girls! It was cold and messy outside -- but as usual it was warm, fun, friendly and full of encouragement inside! I had a couple more ideas about how to add an "edge" to your page and thought I would share them with you. In the layout above (ok...how funny is that picture of me and my sister putting on a "show?") I used a piercing tool to prepare my layout for some hand stitching (I wanted to add a bit more orange to the layout). Then before i did the sewing, I used some distress ink in a similar tone to the background cardstock to darken the edge...then went ahead and added the orange stitching. On the layout below -- I simply used a pencil and a scalloped edge ruler to mark the scallops onto my background. I then painted with white paint on the outside of the scallops and finished it off with a sharpie giving a good thick line to the edge.

Create an Edge to Your Layout

Image
I love this picture of my two nieces. Lindsey got to go visit her new sister in Guatamala. I wanted a little bit of an edge to the page -- but didn't want to distract for those cute little owls or the picture -- so I stitched close to the edge and then used a bit darker distressing ink and rubbed it into the edge. I like the effect...an instant subtle border. Try it...and let me see what you come up with.

Create a Stamping Mask

Image
I love the special look of a die cut edge...but I also like them in smaller sizes than they usually come in -- so I decided to try and make my own. I used a corner and edge punch by Fiskars and then trimmed along the shapes to create the wavy edge. To set off the edge, I used some distress ink to darken the outer edge. I also wanted to stamp just on the inside part of my card. To do that -- I created a mask out of a piece of scrap paper. I placed the mask over my decorative edge and stamped with my script stamp to fill in the center. This is an easy technique to use anywhere on a layout. You can create a shape and then stamp inside of it on your page. Lots of possibilites. Have a great week.