Posts

Showing posts with the label Papertrey Ink Stamps

I haven't lost my mind...

Image
Christmas Card Series 2013 YouTube Play List Hello my friends! Don't call the men in the white coats just yet...I KNOW it isn't even close to Christmas yet...but one of my goals for this year is to send out only handmade cards...so I am starting now! I thought some of you might want to join me - so I am going to do a mini series - focusing on cards that you can make multiples of fairly easily. Later (much closer to Christmas), I will come back and do a few "special" Christmas projects...gifts, home decor, mini albums and some extra special cards. Even if you aren't ready to join me in my quest to get my Christmas cards done, I hope you will be inspired by some of the techniques I will be sharing with you and you can try them on some other types of cards. Today, I am going to share two techniques. The first is LAYERED Backgrounds - combining a cover plate die with a background that has been texturized (either with an impression plate or an embossing fold...

Visual Weight: Collage Stamping

Image
I'm introducing a new series. I thought we might go a bit deeper on some projects and look at why certain things work together to make a good design. You know I'm not big on "rules" when it comes to art...so these tutorials will be more focused on why certain elements appeal to us. This first tutorial is about visual weight. Several of you have asked for a tutorial on creating stamping collages - like I have posted the last few days. I created all of these cards  "Thanks" card , "Vintage Camera" card and "Sunflower Collage" card utilizing the concept of Visual Weight. You can see in this picture that I recreated the the background collage first in just black (no attention paid to visual weight) and then with black a grey (using only intensity to create visual weight). Here is the tutorial... Let me know what you think! Have a great week!

Collage Stamping Has Officially Become an Obsession

Image
I seriously love creating these collage stamped backgrounds! Wish I had discovered it sooner! I am so glad that the Papertrey Ink Make It Monday Challenge got me thinking about this technique.  You can check out the beautiful card that Dawn made here. I am preparing for a class I am going to teach - French Country Inspired Projects . I have had fun researching...finding lots of things that will be my inspiration for creating these projects. I have started a Board on Pinterest called French Country. If you would like to check it out - there is a link over in the side bar that will take you to my Pinterest Account. So, as I am preparing for this class the first thing that I did was to look into color combinations and iconic images that would help give my projects the FEEL of French Country. I found that Golden Yellow, True Red and Deep Blues are often used - so I pulled out some of my supplies that might work within these color ranges.         ...

More Collage Stamping: MIM #110

Image
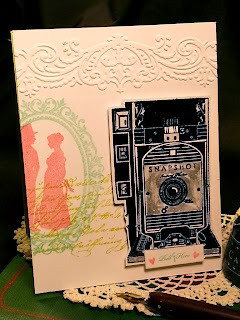
I am having the best time working out these stamping collages! You know I particularly love finding new ways to use supplies I already have...and this technique of using stamps from different collections and pairing them with inks of different intensity to create a cohesive collage is just SO MUCH FUN...and a terrific way to stretch your supplies. Here is a close up...I just love the way the frame draws attention to the silhouetted couple...but because the inks are lighter, the provide balance for the focal image (vintage camera). I also added some embossing to the top because it seemed empty - but I didn't want to add more stamping. Embossing can help you fill space with a bit of texture, but still allows you to maintain the balance of your other elements. The vintage camera is from a stamp set called Shutterbug Special. So very cool - and you can get a matching die...that also cuts that little pull out! Such a great way to add a special sentiment, note or tiny...

Collage Stamping: Papertrey Ink Make It Monday Challenge #110

Image
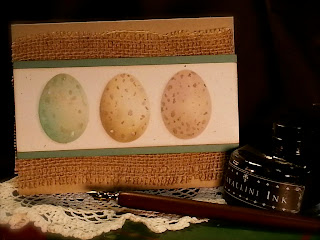
 So...I shared these Easter cards with you...and the tutorial on how to create these dimensional speckled eggs by creating a template with a Papertrey Ink Egg Die.  If you missed it, you can check out the tutorial here.   I had so much fun making these eggs, that I ended up with several card fronts that I didn't turn into Easter cards. I just love those speckled eggs.  When I went to check out this week's Papertrey Ink Make It Monday challenge , I knew I wanted to use some of those extra card bases. The challenge was to do 'collage stamping' - layering different stamps with various inks to create a collage. Since my spotted eggs were created with ink...I felt like they would be a great foundation for my collage. Here is how it turned out...Love it! I used the following Papertrey Ink stamps:  Background Basics-Farm and Barn; Fancy Flourishes; and Thanks All Ways. I also used a Stampers Anonymous Script stamp. Here is a closer view......

Easter Cards - Watercolored Eggs Technique

Image
Yes...I do realize that it is three days AFTER Easter...but I never got these posted for you guys...and I wanted you to have the tutorial for how I created these eggs...because I have another card or two to share with you that I used some of these eggs to make as well! (I know! Bonus!) I have been seeing a lot of speckled eggs on Pinterest. I just LOVE them...and I wanted to figure out how to make them for myself. After I thought about it awhile, I realized that I could probably get a good dupe if I used my distress stains and created an egg shaped template with a die. Here is a video tutorial...it is REALLY simple to make these dimensional eggs...and even if it is past Easter - I will be back to share a card I made with some of my "extra eggs!" Are you as surprised as I was by how quickly they come together and have a real dimensional effect?!?! I couldn't help myself...I made all my cards and then made a few extra....which you will se...

Make It Monday #101 Layered Embossing: Valentines Card

Image
I can't believe that January is coming to an end! Really?!?!? One month of 2013 already gone? Whew...I need to step up my game! *smile* Well - this week I had a blast participating in the Papertrey Ink Make It Monday Challenge. This week the challenge was to Layer Embossing...so that is exactly what I did...I used the Mhendi Medallion stamp set and a stamp positioner to first stamp the large medallion and embossed it with detail black embossing powder. Then I punched four squares out of Aqua Mist, Hibiscus Burst, Limeade, and Hawaiin Shores.  I laid them on top of the medallion and using the stamp positioner and stamped the large medallion again onto the four squares with versa mark ink - and embossed with detail clear embossing powder. Once the squares had cooled, I stamped each square with L, heart, V & E with versa mark ink and sprinkled them with detailed white embossing powder. Before you heat the this layer of the embossing powder - be sure and let your hea...

Chalk Art: Tutorial

Image
I know...I am waaaay late on getting this tutorial posted! Sorry guys. I have been traveling and have just not been as on top of things (yes, I know that sounds like I am ON TOP OF IT ALL if I am not traveling...ha ha...right!). But here it is... hope you enjoy and that you will try it for yourself! Have a great week!

Make It Monday #99 Challenge: Repeats and Rainbows

Image
This week's Make It Monday Challenge over on the Papertrey Ink blog was super fun to work on! Nicole Heady created six rainbow color combo's that I found really fresh and inspiring.  I actually chose the SIXTH rainbow combination: I decided to create several cards based on the color combination - but with dramatically different styles. Here is the first one: For this, I chose to make the background images "tone on tone" - and use the rainbow color combo as the pop of color on the hearts in the centers of the flowers. The sentiment was stamped in Smokey Shadow and I used a glue pen to add Prisma glitter to make the hearts pop just a bit more. A bit of simple stitching created the frame for this card.   This next card I used the "stamping off" technique to create a bit of a shabby chic rainbow background.   I stamped the first generation impression of the doily stamp in bit of a wave across the center of the card front. I then went back and ...

Finished Cards: Chalkboard Art

Image
PTI:Strawberry Patch Well...I finally got the card toppers actually made into cards! My oh my! I had so much fun with this faux chalkboard art technique! So glad I stopped by the Papertrey Ink blog to see what their challenge was for this week.   Besty Veldman totally inspired me to try it...and every time I went into my studio - I just had to keep working on them...I have several more that still need to be made into cards...so I am sure I will have more to share soon. PTI: On the Farm  I love the concept on this one made with the On The Farm Stamps and Dies...but I'm not sure I am loving it...but thought I would share it with you and see what you thought. PTI: Quilled Elegance, Sentiment Signs, & Strawberry Patch PTI: Quilled Elegance, Sentiment Signs, & Strawberry Patch I tried this one on both True Black and Smokey Shadows card stock...I can't really decide which one I like better. On some of the examples of chalkboard art I found on Pinte...

I have a new Obsession: Chalkboard Art

Image
I always have fun checking out several blogs the beginning of the week - to see what their challenges are for card making, art journaling or scrapbooking projects!  I went to Papertrey Ink's blog Capture the Momen t...and saw their video for Make It Monday. Oh My....the challenge was to use your stamps to recreate Chalkboard art! I loved the tutorial by Betsy Veldman ( check it out on PTI Blog here ) and was reminded of one of her posts last fall here . I had meant to try my hand at this - but then got caught up in all of my Christmas creating and forgot all about it. I finally had some time to try it out - and OH MY STARS!!!!! It is so fun! I am in the process of creating a tutorial to show you how I created these card toppers...but I will have to STOP making the card tops and FINISH the cards before I can share that! LOL The supply list is small...and the best part is that you will go through your stamp sets to find little bits and pieces to tuck into your designs....