Posts

Showing posts with the label Mixed Media Art

One Little Word for 2013: JOY

Image
Mixed Media Canvas in Progress I have been a big fan of Ali Edwards for years. She constantly is a source of inspiration - and always reminds me (and all of her blog followers) that it is really important to document our every day life. The story matters. Words matter. Several years ago she introduced an idea - One Little Word - as she was contemplating a new year.  She challenged all of us to figure out what ONE word would be our focus for the next year. If you would like to read Ali's blog about ONE LITTLE WORD 2013, click here I have loved doing this for several years.  Some years it is really clear what my word is supposed to be...it is jumping up and down waving its arms to get my attention. And some years, like this one - it is more of a whisper...a whisper that I might have missed if I didn't pay attention. As I've been thinking about it for a few weeks - I think my word for 2013 is JOY! Not exactly certain what all of that will mean for me - but it feels ...

Christmas 2012: Tattered Poinsettia (December Daily Cover)

Image
I really love the Tim Holtz Poinsettia die and embossing folder! Used together they create a really gorgeous flower.  I cut several out of watercolor paper. I found that watercolor paper is great for using Distress Stains on - they absorb the color but don't pill up AND they give you a really great impression when you use them in the embossing folder. The key to making the flower so vintage and sparkly - is to use a combination of Rock Candy Distress Crackle paint and Dry Distress Glitter. Love how they turned out - they have a bit of a vintage porcelain flower look when you see them up close. I created a tutorial that you can watch here or on YouTube if you want to see the details of how I created the cover for my December Daily. Hope you have a great week...and be sure and save some time for creative play! Blessings, Jann

Christmas 2012 Series: #4 December Daily Binding

Image
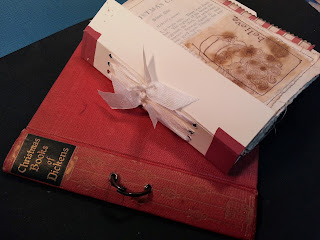
We're making progress! I've gotten the binding done and all my base pages mounted into "signatures." I didn't want to put the binding through the actual spine because I wanted to preserve the title - so I created a hidden "faux" spine to bind the signatures and then I can attach it to the front and back cover. I used seam binding to attach the signatures through the spine. Seam binding is strong - but keeps the vintage feeling of the overall altered book. I created a tutorial to show you the steps in the binding process...you can watch it here or on YouTube: I am working on decorating the cover - and will have that tutorial ready for you soon! Am pretty excited about how it is turning out.  Thanks for stopping by - and I hope you have a wonderfully creative weekend!

Christmas Project Series: Projects #2 & #3

Image
Hope your week is off to a great start and that you had some creative time over the weekend. I was able to work on a card for Sybil (JandSib80 on YouTube).  I really love this knit stamp set from PaperTrey Ink. I know I will want to make several more of these little Sweater Cards.  I'm trying to figure out how to make one of those tacky Christmas Sweaters (I still have a couple in my closet that my Mom gave me - I think she secretly wanted me to be a kindergarten teacher! LOL) Here is the tutorial I did for the Sweater Card. You can watch it here or on YouTube. I also got the base pages made for my December Daily! Do you see muslin patches I sewed onto the base pages? I had some Coffee Dyed fabric left over from when I made my Thanksgiving Blessing Box during the Fall Project Series  so check out that tutorial if you want to know how to make your own.  I tore it into strips and stamped some images and scriptures onto them.  I am going to ...

December Journal Inspiration

Well - I hope if you live here in the United States, that you have enjoyed too much food and plenty of good fellowship with friends and family today.  We had a lovely time - and the guys are in a turkey and football coma (absolute happiness for them, except I seem to have heard quite a bit of yelling at the tv screen - so I am assuming that their teams aren't doing too well!) The perfect time for me to come get a blog post written and to share a little December Journal Inspiration with you. Here is a flip through my journal from last year...and a little peek at my plans for this year's journal.  I have been planning this for a while.  Do you ever do that? Have an idea in your mind - and hope that what you create lives up to your imagination? I am excited about my idea...as I have been collecting bits and pieces for this one for several years...and I am going to be creating several tutorials that hopefully will keep your creative juices flowing if you are working on a Ch...

Happy Labor Day and Fall Project Series # 3

Image
If you are here in the US - today is Labor Day...unofficially a day for the last BBQ of the summer, a signal that fall is coming (not soon enough for me) and the last day we can officially wear WHITE (yes, I know that dates me...but growing up my Grandmother always told us we could only wear white after EASTER and before LABOR DAY...and I always listen to my grandmother). It was also a good day to catch up on a few projects, get the house straightened up and do a bit more decorating for fall. And I was excited to get to put together the little tablescape that I envisioned when I saw this cute filigree pumpkin at Hobby Lobby.  It needed a few more elements...and I wanted to bring in some of the colors of fall....so I picked up a variety of wooden acorns to go with it - knowing that I could find a way to add color to them (I forgot to take a "before" picture...but they were all brown like their tops - I didn't do anything to those). I did do a little video to show y...

I am SO NOT scared of small canvases

Image
So they are a GREAT place to spend a little Creative Play time. These first two tiny canvases ended up being small thank you gifts for two sweet friends.  I found several of these small canvases (they are approximately 2.5 - 3.5 inches) back in the art department at JoAnn's - I think they were no more than $1.  They are wood framed and are basically square or ATC (artist trading card) sized. Small...and totally un-intimidating. I used Distress Stain (yeah - I can't seem to stop playing with that stuff) on the blue one and on the autumnal version, I used acrylic paint and acrylic washes.  The dandelions were stamped and then I used Sakura gel pens to add some dimension to the canvas.  I stamped the pumpkins with Memento Tuxedo Black ink and then colored them with Copics  - but you could use colored pencils or Bic pens - hey - you might even try crayons...remember we're just playing so anything goes! I cut the pumpkins out and popped them up ...