Posts

Showing posts from August, 2011

Creative Play: What If

Image
One of the best ways I have learned to get over the paralysis of perfection is to ask "What If...?" The key to it working is to just let your natural curiosity come out to play. The purpose for asking the question is not a perfect answer...it is knowledge....finding out what happens IF you try something. To begin with try asking one of these questions: 1. What would happen if I used watercolors on different types of paper? 2. What happens if I tear an edge on my paper by hand, with a straight ruler or a deckle edge ruler? 3. What would happen if I put this kind of ink on acrylic paint? 4. What happens if I mix this color with that color? You just turn your desk into a Creative Learning Lab. And later, you can start asking more complicated "What If " questions... just by following your natural curiosity. As you will see in this video, I started with a simple comparison question. I am new to working with Distress Stains, so I began with a simple question &

Creative Play Series: Introduction

Image
I want to invite you to come into my "virtual classroom" where we will throw off the things that keep us from creating with abandon and just have some FUN! Here is a quick introduction to the series: And here are some of the things that I will be using in the first Creative Play Series: Tags Artist Trading Cards (ATC - 3.5 x 2.5) Collage Stamps Sticky Back Canvas Tim Holtz Tag Die Tim Holtz Distress Stains Tim Holtz Distress Ink Perfect Pearls Mini Mister Plain Muslin I-top Brad Maker Archival Ink Claudine Helmuth Multi-Medium Gel Claudine Helmuth Foam Stamps Claudine Helmuth Clear Stamps Please know you don't have to have all of these things...I am just giving you a heads up in case you want to play along with me. I have the first class taped - but since I am still on strict doctors orders to limit my time out of bed (while I am working on getting rid of this pneumonia) I will hopefully get that edited tomorrow....So until then, I will tease you with the t

Magnetic Storage Boards Tutorials

Image
I did finally get the video edited for the tutorial on how I made the storage boards. I broke it up into two videos so will post both of them here. Part One: Part Two: Materials used: Metal Board: You can purchase one on this post on my blog 7 Gypsies Kraft Preprinted Tissue Paper Claudine Hellmuth Matte Medium Stazon Ink Movers and Shapers Dies Hope you all enjoy this tutorial...and please leave me a comment and let me know what you think. Have a great week!

Magnetic Storage Boards

Image
Hello Friends... Hope you are having a great weekend! I have been working my way through a "to do" list that is clearly longer than the weekend will allow for me to get done - but it is still very satisfying to put a check in the box next to an item. Even though I am a great fan of technology - my "to do" lists are still old school...a handwritten list with little boxes next to them - stuck up on my refrigerator for easy review! Three of the items on my list were to 1) Finish shooting the tutorial on how I made my magnetic storage boards, 2) Get the tutorials edited and posted on YouTube and 3) Figure out a way for you to purchase a blank magnetic board or order one that is already made. I have finished taping the tutorial...and will get it edited and posted tomorrow - actually it will be two videos...I wanted to give you a LOT of detail on the techniques that I used...even if you don't want to make one for yourself, the techniques are FUN to play with

Benefits of Creative Play

Image
Do you consider yourself an artist? When I first started getting interested in scrapbooking, cardmaking and other paper crafts...I thought of myself as a CRAFTER....not an artist. And when I think back on it - it really seemed like there was a difference...a crafter was someone who just likes to MAKE stuff....and an artist was someone with SKILLS! I so don't believe that anymore! I think almost everyone I come in contact with is a CREATIVE person...and most are ARTISTS. My definition of an artist is anyone who gives free expression to that part of themselves that is creative. Maybe you are an ARTIST who makes music. Maybe you are an ARTIST who bakes cakes. Maybe you are an ARTIST that paints pictures. Maybe you are an ARTIST that paints pictures with words...or a camera...or with paper and glue. The biggest hurdle I had to get over in order to see myself as an artist was fighting the paralysis of perfectionism. Everytime I sat down to create, I found myself worrying th

Sizzix Shapers Die Storage - Sneak Peek

Image
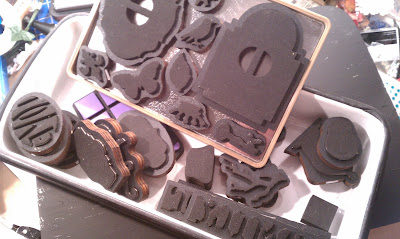
You may remember my post a few days ago where I showed you how I have been storing my Sizzix Movers & Shapers Dies...and there they are in one of my FAVORITE enamelware dishes...but that dish slides onto a shelf...and well....out of sight really is out of mind with me...and I LOVE these dies and want to use them more. So I have been working on a solution...and I now have the "prototype" completed. Because the Movers and Shapers Dies are magnetic...I realized that I could make a metalic board for them that can hang on the wall beside my desk...totally in view when I am working. Here s what it looks like. This really is just a sneak peek....because I am working on a tutorial...and after showing it to a couple of friends, they have said they would like to buy one...so I am working on how to do that in case you want one too. The trick is that your "board" has to be metallic with enough iron in it to allow the magnets to stick to it...and I have a few of them le

New Goodies and An Idea

Image
Can you believe that these yummy Ranger goodies were in my mailbox when I got home today? Me either! I got my design team package today...and these were part of it! I think I actually let out a "WHOOP!" This Summer's CHA was filled with so many products that I fell in love with...but in the category of paint and ink....these three have been at the top of my list. If you haven't seen them before....the big tub - is Rock Candy Crackle Pain t....it gives a clear crackle effect to anything you paint it on....LOVE it for making tags and adding some OLD looking shine to them. Also there is the new Snow Cap Alcohol Mixative ....I cannot wait to play with it. Just like the metallic mixatives (gold, silver, copper) it will ADD to the depth and texture when you are using your alcohol inks on acrylic, glass, ceramic or metal. Fun stuff....am sure I will have some ideas to share soon! And finally...the Picket Fence Distress Stain just makes me almost GIDDY! I have h

Long Overdue

Image
I had a great surprise on Saturday night. Some of you know that I was doing a Scrappy Yard Sale on Saturday...since I have so many wonderful goodies that need to go to a good home. What you may not know is that inspite of the fact that we have had NO RAIN for weeks...although we have had a 30% or greater chance of rain quite often...it still has not rain. So I was not the least bit concerned when on Friday the weather report called for a less than 30% chance of rain....silly me! We were not set up more than an hour before the rain began to fall! I was blessed to have set up under a car port...but everyone else was out in the open air...so we all scrambled to get multiple tables of everthing from ski jackets to CDs to antiques either covered up or pulled under the car port! It was CRAZY! And of course the sky would fool us...it totally cleared up - making us believe that we should drag everything back out again! I am laughing now - because we were quite the comedy show if you h

Every Card Deserves to Be Unique

Image
Materials you will need: Ink: I used Distress Stain - but you could make your own with water and Distress Ink ReInkers Stamping Ink: I used a couple of colors of Archival Ink by Ranger and Vintage Cream from Papertrey Ink Tags: A small to medium tag will fit on an A2 size card Stamps: I used several Tim Holtz stamps to create background texture and a focal image Cardbase and Scraps from your stash I was trying to come up with a way to make a LOT of cards without them looking like they were made with a cookie cutter - and this is what I came up with! Right now I am using this technique to make cards for a friend of mine who is stationed in Afghanistan to share with fellow soldiers that do not get mail or cards from home. I am writing a personal note in each one - and will trust Jason to know which one is meant for the particular soldier that needs it. I know that there is a program called Operation Write Home...and it is terrific...but the focus of it is to provide the t

Scrappy Garage Sale

Image
I am making great progress on "Project Clean Studio!" I have managed to pull EVERYTHING out of my studio and the guest bedroom (where my What You Make It - kit inventory is kept) and have sorted it into three piles: Keep (only my very favorites, tools I use regularly, new things to share with you this fall). Share/Sell (Lots of yummy things here...some of you have already been sent boxes via RAKs and Goody boxes that you have purchased) Toss: These items either went in the trash or a box to take to Good Will or our Community Center. I got braver the longer I worked on it...kind of like that tv show "Clean Sweep" - my "sell and toss" piles got larger and larger. I finally realized that I want to only have those things that inspire me - or I intend to use available in my newly organized studio and office...and that it would be great to let others enjoy the items that didn't make the keep pile. So, I hope to be able to do a video soon of my reorganized