I haven't lost my mind...
 |
| Christmas Card Series 2013 YouTube Play List |
Hello my friends! Don't call the men in the white coats just yet...I KNOW it isn't even close to Christmas yet...but one of my goals for this year is to send out only handmade cards...so I am starting now! I thought some of you might want to join me - so I am going to do a mini series - focusing on cards that you can make multiples of fairly easily. Later (much closer to Christmas), I will come back and do a few "special" Christmas projects...gifts, home decor, mini albums and some extra special cards. Even if you aren't ready to join me in my quest to get my Christmas cards done, I hope you will be inspired by some of the techniques I will be sharing with you and you can try them on some other types of cards.
Today, I am going to share two techniques. The first is LAYERED Backgrounds - combining a cover plate die with a background that has been texturized (either with an impression plate or an embossing folder). The second was a great technique shared on the Papertrey Ink Blog during their Make It Monday Challenge: Double Backgrounds.
 |
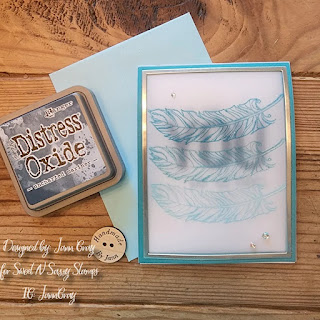
| PTI: Quatrafoil Cover Plate and In Bloom Impression Plate |
Here is an example of a finished background...I really love how the textured background peeks through the cover plate. By gluing them together, you get a really unique look...it appears as if they are one piece of card stock with part of it smooth and part of it texturized. I used Chipped Sapphire Distress Paint and then finished it with some Inka Gold Beeswax Polish (Old Silver and Gold).

I used the Double Background technique to create the green strip behind my Poinsettia Focal image


So I guess you've realized that I couldn't make just ONE! LOL! I thought the pink poinsettias would look better on a turquoise and silver background. (I made a bunch of the poinsettias last Christmas when I was working on my December Daily. If you want to see that video - be sure and read all the way to the end of the post...I will repost it there.
I think you will love making your own textured layered backgrounds...and the Double Stamped technique. I've done a tutorial - so you can see the whole process I used.
Here are a few close ups of the completed cards. I've tried to capture how much shine the Inka Gold Beeswax polish adds to the backgrounds...but they just don't photograph well. I think the turquoise and silver background really has an aged and oxidized silver patina...will definitely be using this combination again soon!


If you would like to see how I created the pink poinsettias I did a tutorial...
Ok...so NOW you can call the men in the white coats if you must! If not, come back and visit again, because I am going to try and get several more designs finalized and will share them as soon as I do!
Hope you have a great week...and be sure and save some time for creative play!


Oh Jann This is so beautiful! I love all the elements and detail you add to your card. Gorgeous! Thanks for joining the Raisin Boat Blog challenge this month. I hope you will join often.
ReplyDeleteHugs,
Linda
Jann, it's nice to see you blogging again. I don't think you're crazy. I started making Yule gifts for the holiday season in June this year. I realized I had at least 27 gifts to make, so I thought I better start early. I love the layered background technique. Wendy
ReplyDeleteIF i was making handmade christmas cards, and after this post, i just might!, it would be smart to start now! thanks so much for the inspiration! :)
ReplyDeleteIt is good to see your creative genius once again. These cards are amazing! I so love the detail you have created on the background pieces. Had I not seen you make it I would not have known there are two different pieces to create these stunning cards.
ReplyDeleteYou, my friend, are a total inspiration all by yourself!
Love you - Leslie
Just love these cards and the way you created them. More things to add to my wish list!! I wonder if anyone else makes similar cover plates?? The Inka Gold makes all the difference to the look, very faux metal. Thank you for the inspiration Jann :)
ReplyDeleteHugs Lynn xx
Hy Jann, your card is gorgeous and you haven´t lost your mind because it´s never to early to start with christmas cards.
ReplyDeleteI have a question, where can I find the flourish stamp that you show in the video??
Hugs from Austia, Nina
This comment has been removed by the author.
ReplyDeleteThis comment has been removed by the author.
DeleteI love this card! it's so beautiful. I purchased some inka golds, did you throw away the little seal after removing the lid? Mine are really dry, do you know of a way to rehydrate them.
ReplyDeleteHey Robin...
DeleteI have found that they do tend to dry up - even if you leave the seal on...but here is a little tip to keep them hydrated (or rehydrate them). Take a fresh baby wipe - crumple it up and place it in the jar and put the lid back on. This has worked for me. I haven't had to change the baby wipe yet - and my pots of Inka Gold have stayed nice and moist.
Hi Jann,
ReplyDeleteI really love your Poinsettia Christmas cards. I have never heard of Inka Gold until I watched your video. Did you use regular card stock or water color paper? I really want to try this technique in the near future. I have you on my favorites now; I look forward to visiting your page in the future to see what other techniques I can learn. Thank you so much for sharing. Happy Holidays to you.
Trish