Whew...I am a tad behind! Here are Christmas 2012 Projects # 6,7 & 8
This time of year I am convinced that the clock actually speeds up! I know the daylight is gone earlier - and even if I stay up later than usual, I still always feel like I am behind. But it is also my favorite time of year. I love the crispness of the air. The fact that people seem to be kinder to each other (ok - I do NOT go to the mall EVER in the month of December, so please allow me to continue in my delusion that people are kinder! *smile*). I really love the twinkly lights and smile as I see homes all decorated with lights and candy canes and deer nodding their heads up and down.

But mostly - I love knowing that this is the time of year that we pause and remember that Jesus - the Son of God - came to this earth to live among us as the Son of Man. Even typing those words gets me all choked up. It doesn't make sense - in human terms - that God would choose to come to earth and take on the body of man...and as a BABY no less. God, Who created the heavens and the earth - chose to come as a baby...who needed to be fed, and cuddled, and sung to and taught to walk and run.
Amazing!
And later - He chose to voluntarily die for my sin. He who was sinless - paid the price for me.
Amazing Grace!
Yes, this is my favorite time of year! And even though I get busier than at any other time of year - I can't help but be happy to share some of my joy in the season with others. With you...my sweet friends and family.


If you would like to watch that tutorial, you can see it here or watch it on YouTube.
 There is a bonus tutorial in the video explaining how to use an embossing folder diffuser. It is a really cool tool that allows you to get so much more mileage out of your embossing folders. A diffuser lets you select an area to NOT emboss at the same time you are embossing the rest of your card base. You will want to check it out. In the process of learning to use the diffusers, I ended up with several card bases and thought I would use up some of the small 3D stars I made while learning to use the Bright Star die. Here is another card...bonus!

And finally, today I had a blast creating this rustic button tree card with a bit of sparkle and shine. I cut the buttons out of watercolor paper, stained them, embossed them, stained them some more, put clear crackle paint on them and a touch of vintage glitter! I used the Papertrey Ink Button Dies, but you could use circle punches to create your own. Even though I call it a "Button Tree" - I really recommend you making it out of watercolor paper as opposed to real buttons because they are easier to distress and add the sparkle and shine. However, I do think a button tree made of real buttons would be cool too! Just another idea to pursue! *smile*


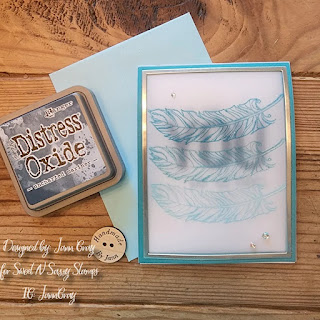
 I am working on our next project and am anxious to get to finished and the tutorial done for you. Thought I would leave you with a little glimpse of one of the components of the card I am making. I hadn't seen the FROSTED FILM that is part of the Tim Holtz Ideology collection, but when I did...oh my stars! It is GORGEOUS! It is sticky on one side and really has the look of frosted glass. I am also using a couple of Poppystamp dies - Gothic Luminary and Gothic Frame (not pictured here). I am working on creating a stained glass card...so hopefully will be back soon to share the final project.
Have a great week...and Merry Christmas!

Amazing!
And later - He chose to voluntarily die for my sin. He who was sinless - paid the price for me.
Amazing Grace!
Yes, this is my favorite time of year! And even though I get busier than at any other time of year - I can't help but be happy to share some of my joy in the season with others. With you...my sweet friends and family.

I feel very blessed to get to share this Christmas Project Series with you...and I apologize that I am a bit behind in getting them posted here on my blog...I will try and get caught up here...and stay current as we move on through the month.

This holly card was not what I had in mind when I first sat down in my studio. I had planned to work on creating a rustic card with the Tim Holtz Bright Star Die. It cuts and scores your material so you can create a 3D star (in two sizes).

I had planned to make the stars out of some thin copper sheeting (you could also carefully open up a metal soda can and "recycle" the can into lovely Christmas decor or card). And since I thought they would end up being rather rustic looking - I had planned to use some canvas so create a backdrop for the stars. I was going to use another of Tim Holtz's Christmas product line - the holly branch embossing folder.

As the saying goes, "the best laid plans....oft go astray"....but when you are a creative sort - going astray is a good thing! If you would like to see how I got to the Holly Card - check out this video tutorial. You can also watch it on YouTube.
But I didn't abandon the star idea...I just had to come back to it later. These were the cards I created when I came back into the studio to see what I could do with those lovely stars and a fresh look at what they needed.


If you would like to watch that tutorial, you can see it here or watch it on YouTube.
 There is a bonus tutorial in the video explaining how to use an embossing folder diffuser. It is a really cool tool that allows you to get so much more mileage out of your embossing folders. A diffuser lets you select an area to NOT emboss at the same time you are embossing the rest of your card base. You will want to check it out. In the process of learning to use the diffusers, I ended up with several card bases and thought I would use up some of the small 3D stars I made while learning to use the Bright Star die. Here is another card...bonus!
And finally, today I had a blast creating this rustic button tree card with a bit of sparkle and shine. I cut the buttons out of watercolor paper, stained them, embossed them, stained them some more, put clear crackle paint on them and a touch of vintage glitter! I used the Papertrey Ink Button Dies, but you could use circle punches to create your own. Even though I call it a "Button Tree" - I really recommend you making it out of watercolor paper as opposed to real buttons because they are easier to distress and add the sparkle and shine. However, I do think a button tree made of real buttons would be cool too! Just another idea to pursue! *smile*

Here is a tutorial to show you how I put this card together. I think one of the things I like the best about it are all the "imperfections!" If you watch the video - you will see that after I embossed the card base, I somehow got some green ink on it...probably from when I was working on the buttons. But, instead of throwing it away - I just used it - and added more "green stains" so the one stain wouldn't be lonely! Also, as I was adding the walnut stain, I accidentally touched the edge of the ink pad onto the center of the card...again - I decided to just make it part of the design...and added more "accidents" with the ink pad and then use some water and a paintbrush to soften them. Love that Distress Inks react with water - and you can actually get a bit of a watercolor look when you add a little H2O.
Here is one more tutorial (yeah...crazy post! Three tutorials? Really??!?!?!) Mmmm Hmmm - it's just the "giving" time of year...and I'm a giver! LOL You can watch it here - or on YouTube.
Whew! I think we are now CURRENT! Let's try and keep it that way, ok? Here is a close-up of the button tree - wanted you to see all that sparkly, embossed and stained goodness up close!


Have a great week...and Merry Christmas!


Lovely cards.I always learn something new when I watch your video's. Thanks so much!!!
ReplyDeleteOh wow Jann you have been a busy girl! All of these magical specials you have created to share with us, I certainly appreciate it as you inspire me and love how you share your knowledge. However you are such an enabler too and my wish list grows ever longer :)
ReplyDeleteOkay now I must go and watch your videos especially the diffuser one as I love that technique and do like the stars too. Now which of these is my favourite......mmmmmmmmmm decisions, decisions - all of them :D
Hugs
Lynn xx
oooh swoon!!! I love your voice (accent)!!!
ReplyDeletenow I "need" that star die. and more TH inks... hello santa?
thanks for the tutorials!
: .)
happy 12/12/12
Four years later, and I still love this card! Thank you for the details you shared in your video.
ReplyDelete