OH MY STARS: The Parable of a Clean and Simple Card
Actually... o. my. stinkin'. stars!
So...many hours ago I had an idea. It was a simple idea. A good idea. An idea that it would be fun to do a "start to finish" video tutorial on making a simple birthday card.
Did I mention that I had this idea HOURS ago? It is Royce's birthday tomorrow...and I had been thinking about the card I wanted to make for him for several days. It was all worked out in my head. So I got out all of these lovely supplies....and started the video camera.


So I was back to the drawing board...time to turn off the camera...we were not going anywhere fast! LOL! So I liked the IMPRESSION part of it...but it was just TOO busy...so I decided to turn the big star die OVER and use the same sandwich to impress the BACK side of the star into the card stock. I REALLY liked this - the other way, you end up with a "line art" shape - but this way gives you a deep impression of the solid shape.

My only problem was that I had used a bit of painter's tape (masking tape) to hold the die in position, and when I removed it, the tape peeled a bit of the paper off...STINK! - but I knew I was on to something. I did it again....and this time it worked.

I used one of the big stars from the Super Stars stamp set to stamp into the center...and added my sentiment centered below the impressed star. I liked it - but you know me....if there is a whole lot of WHITE staring up at me...something is about to get messy! *hee hee!!!!!
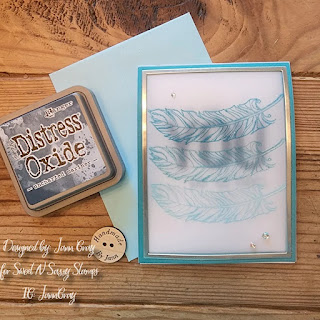
I used some water and acrylic paint and spattered it up! I was much happier! Out of all those die cut stars...three little stars from the border strips made it onto the front...but I like how it gives a bit of weight to the bottom of the card. I felt the big impression of the star on top made it a bit "top-heavy." The last detail was to take a blue pen and ruler and make sketchy lines around the outside edge of the star...I kept the lines REALLY thin - as I wanted the star impression to be the focus.


To dress up the inside of the card, I used the smallest star die and flipped it over and impressed it into the lower right corner of the panel. I stamped another star stamp from the Super Stars set into the impression. The finishing touches on the inside panel were to stamp the Happy Birthday sentiment and add some chevron washi tape to bring all the colors together. It also helped give visual weight to the top where the sentiment is smaller and thinner and the impressed star at the bottom could have over powered it.
So here I am...hours later...no video to share because the process just got TOO complicated as I tried to create a clean and simple card. *sigh* Moral of the story...not all things are what they seem. A simple card, may in fact require that you put on your "thinking cap" and persevere! That too is all part of being an artist!
Have a great week friends....hope you have some great creative ideas...and that you will persevere all the way to seeing them become a reality!
So...many hours ago I had an idea. It was a simple idea. A good idea. An idea that it would be fun to do a "start to finish" video tutorial on making a simple birthday card.
Did I mention that I had this idea HOURS ago? It is Royce's birthday tomorrow...and I had been thinking about the card I wanted to make for him for several days. It was all worked out in my head. So I got out all of these lovely supplies....and started the video camera.


My had two parts to my beginning idea. The first was to use some star shaped wafer dies to IMPRESS the star image into the cover of my card. And for the second, Royce is always teasing me about saying "Oh my stars!"...and when I came across a stamp (Papertrey Ink: Glory Be) that had the Oh My Stars stamp in it, I KNEW I wanted to use that as the front sentiment for his Birthday Card.

I don't know if you have ever tried to do this, but it is a pretty cool way to get more out of your dies. I will do a video showing you how to do this if you all are interested...but the basics are you place the die with the cutting edge down onto your paper - but place your embossing matt (thin silicone rubber) underneath your paper. This keeps the die from cutting all the way through. You may need to test a couple of sandwiches to see what works best in your die cut machine (sizzix or cuttlebug). I ended up using the basic sizzix platform with NO tabs, a cutting plate, a thin chipboard shim, the silicone mat, my paper face up, the stars dies face down and the second cutting plate. My paper is thick Stampers Best card stock (approx 120lb weight) - so with that additional thickness I didn't need another shim. If I used a thinner paper, I might have added a second silicone mat to make sure that the die didn't cut all the way through. So play around with it for yourself with your own supplies.
I cut stars out of green and a couple of shades of blue paper that I had stamped some backgrounds onto for interest. I cut star borders...I had stars coming out my ears...and was headed to the "finish line."

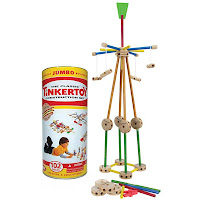
I pre-stamped some stars from the Super Stars Stamp Set (Papertrey Ink) - and added my "Oh my Stars" sentiment....then used the star dies to impress the shapes. As you can see...it all went as planned....except for the fact that it resembles a card best suited for someone who would also be receiving a Tinker Toy set on their birthday! *sigh*

So I was back to the drawing board...time to turn off the camera...we were not going anywhere fast! LOL! So I liked the IMPRESSION part of it...but it was just TOO busy...so I decided to turn the big star die OVER and use the same sandwich to impress the BACK side of the star into the card stock. I REALLY liked this - the other way, you end up with a "line art" shape - but this way gives you a deep impression of the solid shape.

My only problem was that I had used a bit of painter's tape (masking tape) to hold the die in position, and when I removed it, the tape peeled a bit of the paper off...STINK! - but I knew I was on to something. I did it again....and this time it worked.

I used some water and acrylic paint and spattered it up! I was much happier! Out of all those die cut stars...three little stars from the border strips made it onto the front...but I like how it gives a bit of weight to the bottom of the card. I felt the big impression of the star on top made it a bit "top-heavy." The last detail was to take a blue pen and ruler and make sketchy lines around the outside edge of the star...I kept the lines REALLY thin - as I wanted the star impression to be the focus.


To dress up the inside of the card, I used the smallest star die and flipped it over and impressed it into the lower right corner of the panel. I stamped another star stamp from the Super Stars set into the impression. The finishing touches on the inside panel were to stamp the Happy Birthday sentiment and add some chevron washi tape to bring all the colors together. It also helped give visual weight to the top where the sentiment is smaller and thinner and the impressed star at the bottom could have over powered it.
So here I am...hours later...no video to share because the process just got TOO complicated as I tried to create a clean and simple card. *sigh* Moral of the story...not all things are what they seem. A simple card, may in fact require that you put on your "thinking cap" and persevere! That too is all part of being an artist!
Have a great week friends....hope you have some great creative ideas...and that you will persevere all the way to seeing them become a reality!


Okay that was hilarious! In fact, after reading that blog post - I just have to say, "Oh my stars!!!" LOL!
ReplyDeleteYour cards turned out great though! LOVE IT!
But you ended up with two cards Jann LOL. I'm sure you can think of someone who the first card would suit.
ReplyDeleteLoved Royce's birthday card and hope he has a great day.
Have a great creative week :)
Hugs
Lynn x
What a fantastic way to use dies! I would have never thought to do this. It is an awesome tip to share.
ReplyDeleteI love the card you made for Royce. Happy Birthday, Royce!
Sometimes the grand ideas that take flight in our brains have to altered just a wee bit during the actual process of creation. That is when we find the problems lurking :D Plus you find the bonus in the process as well!
Looking forward to an alternative video on this fantabulous idea of yours!
Love you - Leslie