Saving An Imperfect Picture
The two main reasons that I got into scrapbooking were my love of photography and my love for storytelling. Scrapbooking was the perfect marriage between the two. Some pictures tell the whole story...and some stories don't need anything added other than the listener's imagination. But most of the time - you don't get the PERFECT picture and there are details of a story that need the help of the picture for the whole story to be told.
So what do you do when your picture is less than perfect? Here are a few ideas.
1. Crop out unnecessary parts of the picture...if there are things that are distracting from the focal image - just cut them out.
2. Get in close...this is a suggestion that I actually believe helps you GET the perfect picture. We tend to stand back from our subject and take the picture from a distance. I find that I love my pictures more - even if they are a bit too over/under exposed or fuzzy if I have zoomed in close and just captured the emotion. This picture below is a great example of this principle. It is too light, and my focus wasn't good...but how precious is the interaction between these two...I LOVE it! So if you can...get as close as you possibly can or crop out everything but the part that you NEED to be seen.

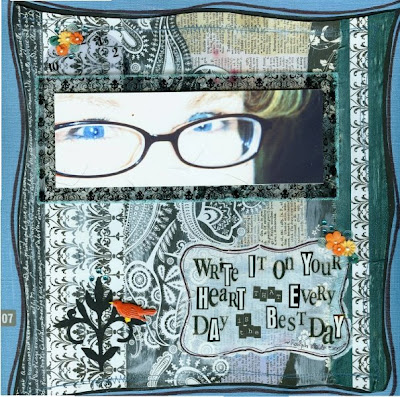
The layout at the top of this post, is another example of me using these two picture saving ideas. I needed a strong image that would support the journaling that I wanted to share - a quote that I had fallen in love with - "Write it on your heart that every day will be the best day!" I felt that if I had used my whole face, it would have detracted from the quote - which I wanted to take center stage...and besides that, the background was TOO busy...so I just cut out the part of the picture that worked...my eyes and went with it. It was a little scary getting the exacto knife and ruler out and cutting major parts of the picture out. But I don't think it would have worked if I hadn't.
3. Turn it into a black and white. Sometimes changing a less than perfect picture and removing the color from it can make a big difference on the impact the picture has on your page. Before you lose the picture....lose the color and see if it helps. Here is an example...the top picture is super sweet...but it is ORANGE...and even my photo editing software didn't help much (this example is AFTER I tried to color correct it)....but I was able to salvage it by turning it into a black and white photo.

Now I love it - and on top of it all - a B/W Photo works with ANY paper that you might want to use....BONUS! *smile* Hope these ideas help you find a way to use those pictures that captured something important in a perhaps less than perfect way!
Hope you have a great second half of the week. I am making progress on cleaning the studio. I have been able to create some FANTABULOUS boxes of goodies to sell on Ebay or at the Garage sale I am participating in on August 6th - so if you want me to reserve one for you...let me know now...I am headed to the Post Office on Friday with a group of boxes for folks who have already purchased some and will be happy to add one for you as well!


I'm so glad you are posting to your blog once again. I know the last six months or so you have been in dire need of two or more of you.
ReplyDeleteLove the examples you have shared. This is excellent information for the beginners with a perfectionist mind set. Also as a spring board for those of us that have been doing this for a while. Awesome layout you use at the top of your post.
Goody goody!!! Your goody boxes are being snapped up. And a yard/garage sale coming up. Pretty soon you will have a place to put that photo of you and Tim Holtz :-)
Love you Girlfriend - Leslie